- 摘要
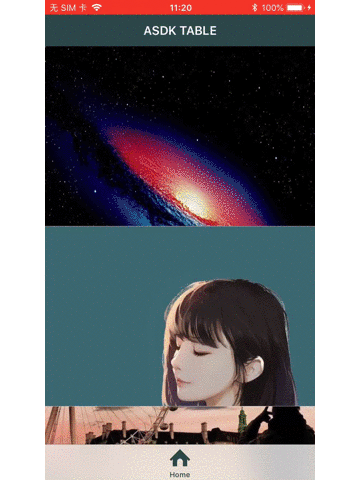
初识ASDK(AsyncDisplayKit/Texture),通过Demo验证对文档的理解.本文使用Texture实现类似「字里行间」App和先前「开眼」App列表的图片动效.
为什么使用Texture?
此处引用即刻技术团队在「知乎」上的论述
view缓冲池是一种比较常见的优化方案,但是只能降低view创建和销毁的开销,对于布局和渲染的性能没有太多帮助。即刻的消息流有非常多样的布局和大量的图片,单靠hidden是没有办法避免布局约束变化的。手写frame也就像我们提到的,保障的是性能,牺牲的是编码效率和可维护性。我们也研究过网上各种各样的优化方案(在本系列第一篇里面有相应的讨论,包括Autolayout算法的性能问题),总的来说治标不治本,在新设备多核化的大趋势下,只用主线程来承担绝大多数任务是很大的浪费。
ASDK的作者Scott之前就是Apple的UIKit team的工程师,他认为布局必须在主线程的原因是因为早期设备只有单核,并且最初的移动sdk的设计也是为了简单可靠而选用单线程。而如今要改成异步的话,面对海量已有app的兼容是巨大的工程,因此Apple只能在已有基础上优化,继续坚持主线程布局渲染。作为平台提供商,Apple理所应当专注于基础框架和系统层,对于布局的高级抽象确实不是他们所擅长的,姗姗来迟的UIStackView和bug不少的UICollectionView就说明了这一点。
对于像ASDK这样如此复杂的布局渲染框架来说,有坑是难免的。我们也踩了不少坑,好在目前看来,ASDK的community比较活跃,bug修复也比较积极(我们也给Apple提过不少bug,然而几个月不回bug report是常有的事)。
总的来说,带来的好处和理念上的进步多于现有的问题,因此从我们的实践经验来说仍然是值得的。
实现的效果
关键代码
ASViewController
基类使用ASViewController,只需要引用<AsyncDisplayKit/AsyncDisplayKit.h>头文件即可
ASTableNode
ASTableNode的初始化写在了当前ViewController的init方法里1
2
3
4
5
6
7
8
9
10
11-(instancetype)init {
_tableNode = [[ASTableNode alloc]init];
self = [super initWithNode:_tableNode];
if (self) {
self.navigationItem.title = @"ASDK TABLE";
_tableNode.dataSource = self;
_tableNode.delegate = self;
//...more
}
return self;
}
相应的,跟UITableView类似的,<ASTableDelegate,ASTableDataSource>
值得一提的是Cell的的代理方法重写方式稍有不同1
2
3
4
5
6
7
8
9-(ASCellNodeBlock)tableNode:(ASTableNode *)tableNode nodeBlockForRowAtIndexPath:(NSIndexPath *)indexPath {
ASCellNode *(^ASCellNodeBlock)(void) = ^ASCellNode *() {
WKACoverCellNode * cellNode =[[WKACoverCellNode alloc]initWithImgURL:self->_imgsUrlArray[indexPath.row]];
return cellNode;
};
return ASCellNodeBlock;
}
其中WKACoverCellNode即是自定义Cell,父类是ASCellNode.另一方面1
2
3
4
5
6
7#pragma mark - ASTableDelegate methods
// Receive a message that the tableView is near the end of its data set and more data should be fetched if necessary.
- (void)tableNode:(ASTableNode *)tableNode willBeginBatchFetchWithContext:(ASBatchContext *)context
{
[context beginBatchFetching];
[self loadPageWithContext:context];
}
如果使用这个方法,则可以很便捷的实现,滑动到底部时,加载更多数据.实际体验很好.
ASCellNode
自定义Cell同样在init方法中初始化控件.但是布局写在另外的方法中.1
2
3
4
5
6
7
8
9
10
11
12
13
14
15
16
17-(instancetype)initWithImgURL:(NSString *)imgURL {
self = [super init];
if (self) {
_coverImgNode = [[ASNetworkImageNode alloc]init];
_coverImgNode.delegate = self;
_coverImgNode.URL = [NSURL URLWithString:imgURL];
_coverImgNode.layerBacked = YES;
// instead of adding everything addSubnode:
self.automaticallyManagesSubnodes = YES;
//为滑动效果添加的代码
self.clipsToBounds = YES;
}
return self;
}
本Demo只用了一个网络图片的控件ASNetworkImageNode.
布局
ASDK的布局方法丰富、灵活.官方Demo中也给出了YogaKit方式以实现跟ASLayout相同的布局.1
2
3
4
5
6
7
8
9
10
11
12
13
14-(ASLayoutSpec *)layoutSpecThatFits:(ASSizeRange)constrainedSize {
//垂直
ASStackLayoutSpec *vStack = [ASStackLayoutSpec verticalStackLayoutSpec];
CGRect screenRect = [[UIScreen mainScreen] bounds];
//CGFloat screenScale = [[UIScreen mainScreen] scale];
CGSize screenWidthImageSize = CGSizeMake(screenRect.size.width, 200 * 2);
_coverImgNode.style.preferredSize = screenWidthImageSize;
[vStack setChild:[ASInsetLayoutSpec insetLayoutSpecWithInsets:UIEdgeInsetsMake(-0.5 * 200, 0, 0, 0) child:_coverImgNode]];
vStack.style.maxSize = CGSizeMake(screenRect.size.width, 200);
return vStack;
}
ASStackLayoutSpec与StackView类似,使用也最为广泛.这里我使用.style.maxSzie设置行高
.style.maxSize CGSize 类型,可选属性,为布局元素提供最大尺寸,如果提供,maxSize 将会强制使用。 如果子布局元素的 maxSize 小于其父级的 maxSize,则强制使用子级的 maxSize,并且其大小将扩展到布局规则之外。
添加设置滑动特效
思路:ASNetworkImageNode高度是行高的2倍,通过UIEdgeInsets设置ImageNode顶部超出Cell行高的一半.Cell中添加变换的方法1
2
3
4
5
6
7
8
9
10
11
12
13-(void)cellOffsetWithTableNode:(ASTableNode *)tableNode {
CGRect centerToWindow = [self convertRect:self.bounds toNode:nil];
CGFloat centerY = CGRectGetMidY(centerToWindow);
CGPoint windowCenter = tableNode.position;
CGFloat cellOffsetY = centerY - windowCenter.y;
CGFloat tableHeight = tableNode.frame.size.height;
CGFloat offsetDig = (cellOffsetY / tableHeight)*(200);
CATransform3D transY = CATransform3DMakeTranslation(0, -offsetDig, 0);
_coverImgNode.transform = transY;
}
值得注意的是,
1.ASDK的方法convertRect:toNode:对应UIKit中的convertRect:self.bounds toView:self.window,但是ASDK基于Node是不能直接发送View的.
通过查看源码,这里我们发送nil.方法内可以自动获取到window,从而也取得了相对位置的值.1
2
3
4
5
6
7
8
9
10
11
12
13
14- (CGRect)convertRect:(CGRect)rect toNode:(ASDisplayNode *)node
{
ASDisplayNodeAssertThreadAffinity(self);
if (node == nil && self.nodeLoaded) {
CALayer *layer = self.layer;
if (UIWindow *window = ASFindWindowOfLayer(layer)) {
return [layer convertRect:rect toLayer:window.layer];
} else {
return rect;
}
}
//...
}
2.和UIKit不同的是,不能直接向ImgNode.transform发送CGAffineTransform,必须为CATransform3D.
Cell中写好变换,在TableNode的代理方法中调用1
2
3
4
5
6
7
8
9-(void)tableNode:(ASTableNode *)tableNode willDisplayRowWithNode:(WKACoverCellNode *)node {
[node cellOffsetWithTableNode:_tableNode];
}
-(void)scrollViewDidScroll:(UIScrollView *)scrollView {
NSArray<WKACoverCellNode *> *array = [self.tableNode visibleNodes];
[array enumerateObjectsUsingBlock:^(WKACoverCellNode * _Nonnull obj, NSUInteger idx, BOOL * _Nonnull stop) {
[obj cellOffsetWithTableNode:self.tableNode];
}];
}
在UIKit中,是不需要向Cell的cellOffsetWithTableNode:发送tableNode的,直接使用superView就能取到正确的值.但在ASDK中取到的是nil.
初步推测是因为ASDK的异步特性导致,这点我后续会继续研究,欢迎探讨.
代码在这里github
- 参考文章:
Texture官方文档和Demo
[译] AsyncDisplayKit/Texture 官方文档(2)
Cell特效之图片随着TableView的滑动上下移动
以上.